
Oversize Animal Collage
Oct 22, 2022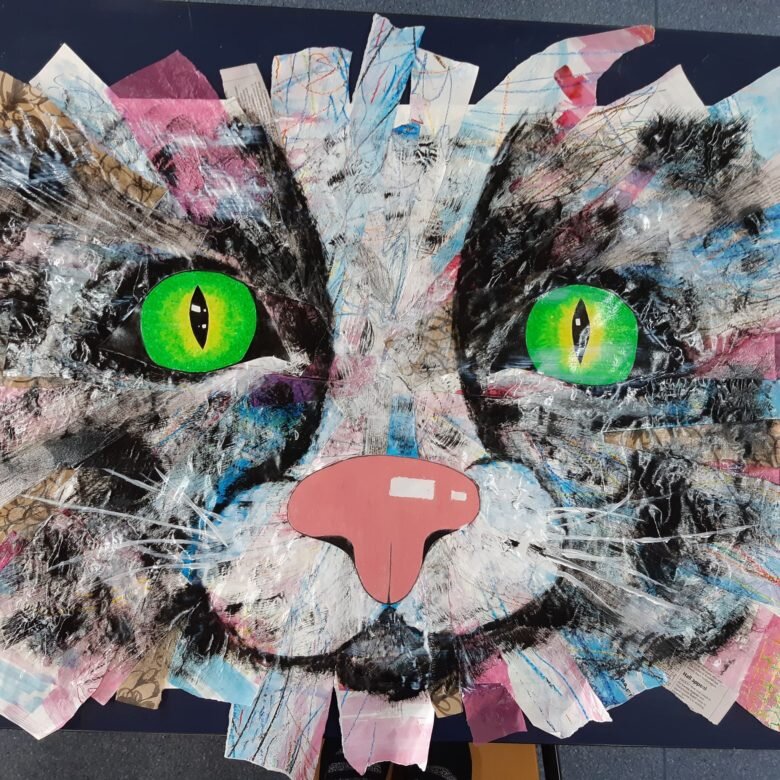


Like most projects I bring into my lessons, I find the inspiration from other creative classrooms doing amazing work all over the world. A good ‘ol scroll through pintrest and instagram, a pin for later or a saved post, and suddenly there are a billion potential directions for any media, topic or theme. Now the problem is which one to choose!
I came across this ‘Animal Collage’ project that had been tried and tested with gorgeous results from two of my go to online art teacher feeds; The Elementary Art Fun Blog and Art Room Brit blog.
In both examples this task had been done with primary students, but I could see the skills and techniques could certainly be applied to Junior High school, in my case Year 8 Art.
This project is super tactile and BIG (we went A2 size), the students loved seeing the visible (quick) progress of their artwork every lesson – this was fun! It also allows students to test and trial heap of different mediums and materials, and it involves multiple art making techniques of drawing, blending, painting and collage. It was a perfect opportunity to introduce new vocabulary: techniques, processes, materials, medium. AND … AND … just for fun we had a look at the work of Wassily Kandinsky and introduced the concept of ‘musical automatic’ drawing to create the paper for our collage. Because of the variety of skills and concepts in this unit I was able to assess the following criteria:
Assessment criteria –
-
Exploration of tone and texture to illustrate animal details – fur, eyes, nose
-
Skillful use of and application of collage method
-
Refinement of skills and techniques in finished artwork.
-
Artist self reflection and written analysis
You can find the Animal Collage Project Task sheet here. This outlines all the project steps, assessment criteria and a student self-reflection worksheet for the end of the unit. I elaborated on some of our project steps and includes some inaction shots below.


The Project Steps
Preparing the paper for collage:
Musical Automatic drawing was developed by the surrealists, as a means of expressing the subconscious. In automatic drawing, the hand is allowed to move “randomly” across the paper whilst prompted by music.
For this task we listened to the most gorgeous piece of music; The Carnival of the Animals Symphony and responded with oil pastel through line, shape and colour. This was great as each score within the piece represented a different animal and could be easily illustrated in a variety of ways on the page. After each score I paused the music and asked the students what animal they thought the music represented. This opened a beautiful discussion on how animals, their habitat, the way they move was represented by different sounds, tempo, and instruments. Then we wrote the correct animal underneath their drawing and continued on to the next. I was surprised at how relaxed, responsive and fully focused my class was during this task. We ended up listening to this orchestra all lesson! The final step was to add coloured ink over our oil pastel. (For this paper we used a thin 80-100gsm as we would rip it up for collage).


Collage:
Tear background artwork into strips and glue onto your artwork page. You can swap strips with your peers to place a variety of colour, tones and textures for your background. You can also use other scrap and printed papers such as newspaper, magazines, old maps etc. Glue each strip like the examples provided, ensuring all paper ends are glued down securely.


Eyes & Nose:
-
Using analogus colours create a blending trial with oil pastel in your visual diary.
-
Create an eye and nose template by placing three A4 pieces of paper on your collage in the place of each eye and nose. Sketch the outline of an eye and nose. Look up photos of eyes and nose from animals to help you create the correct shape.
-
Use blank ink to paint the pupil and outside of the eye and outside of the nose. You may need more than one coat of ink.
-
When it is dry apply an analogus colour scheme with blending. You can follow the below tutorials for guidance to complete your eyes and nose.
-
Varnish with MOD PODGE and leave to dry. Glue onto background.
Video tutorials from Elementary Art Fun Blog:
Eye Tutorial – https://www.youtube.com/watch?v=reCuvNjmKAg
Nose Tutorial – https://www.youtube.com/watch?v=aZL4C6TH6-Y


Finishing with Fur Texture:
Using ink and a fan brush, create a page of trials in your visual diary that reflect fur textures of your chosen animal. Keep your brush strokes large and organic/messy. Apply black ink to drawing. You can apply use the same technique with acrylic paint to achieve grey, brown and white furry textures.


Complete! To make sure these gorgeous collages stay in tack, add a layer of mod podge gloss.


Fancy Finger Painting Baby Art Guide

Free Winter Art Activity Pack

free winter art activity pack download
Free Art Activity Pack